Answering Your Most Common Makeup Brush Questions on Google
You spend money on makeup brushes that are supposed to last a long time, but do yours somehow always fall apart? Let's unravel the mystery of your broken brushes so you can keep them longer and keep more money in your pocket.
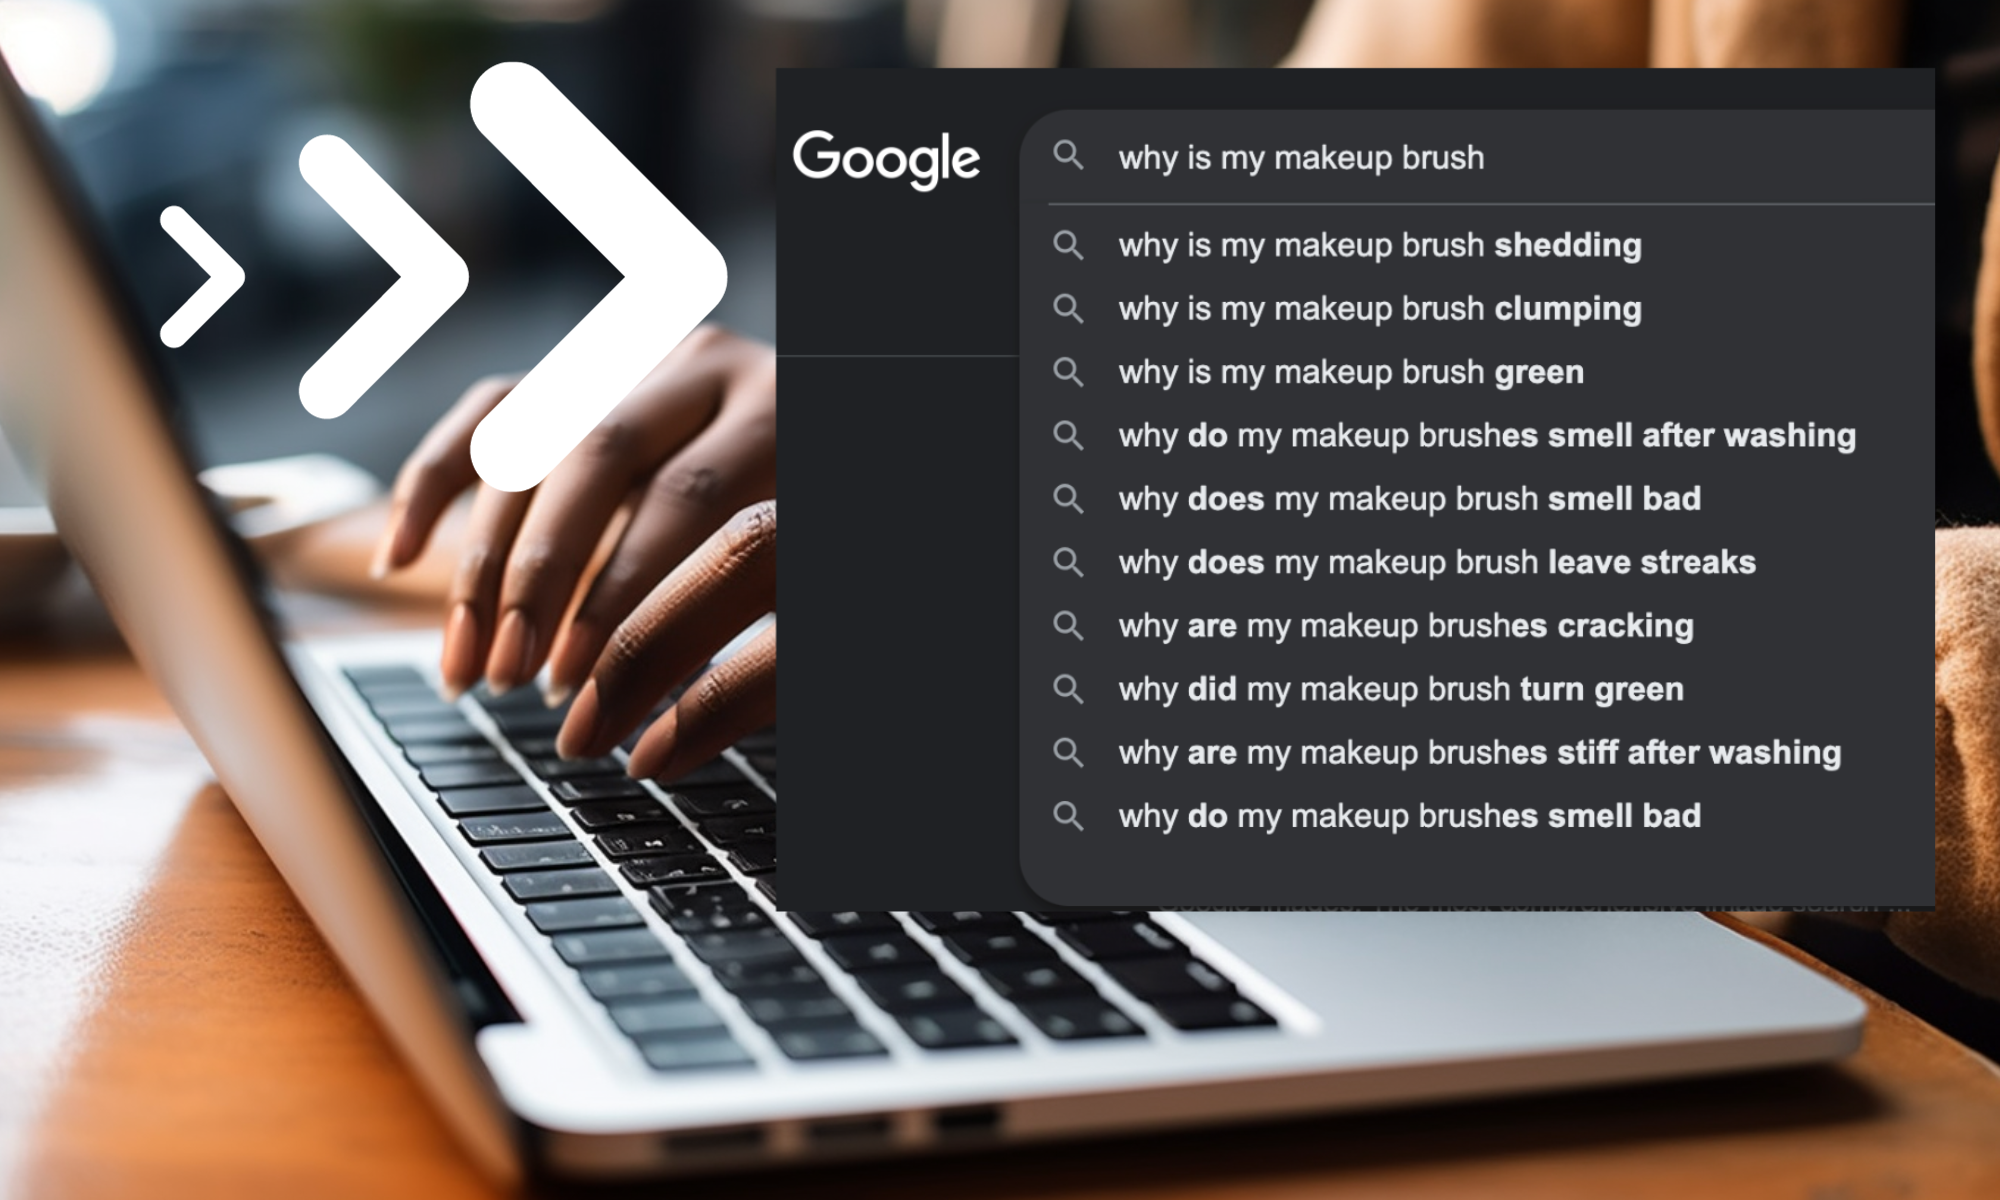
We scoured the internet for the most commonly asked questions about makeup brushes (it was really just a peek at what Google suggested) and found that a lot of questions you're asking have to do with the reasons your makeup brushes are breaking to pieces.
Here are the top questions asked in the order they were suggested:
Why is my makeup brush shedding?
Your makeup brush is shedding for one or more of the following reasons.
-
Quality of the Brush: Low-quality brushes are more likely to shed because the hairs are not securely held in place. Investing in high-quality brushes like Oxygenetix new Foundation and Concealer Brush made with better craftsmanship and materials can reduce shedding.
-
Cleaning: Over time, makeup residue, oils, and bacteria can build up in the brush bristles, causing them to weaken and eventually shed. Regular cleaning is essential to maintain the brush's integrity. Clean your brushes with a gentle brush cleanser or mild shampoo and allow them to dry thoroughly.
-
Rough Handling: Excessive force or rough handling of the brush can lead to hair breakage and shedding. Be gentle when applying makeup and when cleaning your brushes. Avoid pulling or tugging on the bristles.
-
Excessive Heat: Heat can weaken the glue that holds the bristles in place. Avoid using a hairdryer or placing your brushes near a heat source to speed up drying after cleaning. Let them air dry naturally.
Why is my makeup brush clumping?
Your makeup brush is most likely clumping due to excessive product buildup or improper drying techniques.
-
Product Buildup: Makeup products, especially liquid or creamy ones, can accumulate in the bristles over time, causing them to stick together. Proper cleaning of your brushes is essential to remove product buildup. Clean your brushes regularly with a gentle brush cleanser or mild shampoo to prevent clumping.
-
Drying Incorrectly: Improper drying after cleaning can also lead to clumping. If you don't allow your brushes to dry completely, the moisture can cause the bristles to stick together. Make sure to thoroughly shake out excess water and allow your brushes to air dry flat or with the bristles facing downward.
- Dried Product: If you've used a product that dries quickly, such as certain liquid eyeliners or waterproof mascara, the residue from these products can harden in the bristles, causing them to clump. Clean your brushes promptly after using such products to prevent this issue.
- Storage: Storing your brushes improperly, such as leaving them in a cramped or damp environment, can affect the bristles and lead to clumping. Ensure your brushes are stored in a clean, dry place with proper ventilation.
Why is my makeup brush green?
If your makeup brush is green and you know it isn't leftover residue from colored makeup products, it could be for the following reasons.
-
Chemical Reaction: In some cases, certain makeup products or ingredients in the products can react with the bristles of the brush, especially if the bristles are made of synthetic materials. This chemical reaction can cause the brush to change color over time.
-
Mold or Mildew Growth: If your makeup brush has been exposed to moisture and stored in a humid environment, it can develop mold or mildew. The presence of mold or mildew can cause the brush to appear green or discolored. This is a hygiene issue and should be addressed immediately.
-
Metallic Residue: If your brush has metal components (such as a ferrule) and the metal has corroded or reacted with other substances, it can lead to discoloration of the brush.
-
Cleaning Products: The use of harsh cleaning products or solutions that contain chemicals that interact with the brush bristles can potentially cause discoloration.
Why do my makeup brushes smell bad?
If your makeup brushes smell checkout these possible causes and solutions to the problem.
-
Residue Buildup: Makeup residue, oils, and leftover cleaning products can accumulate in the brush bristles, leading to an unpleasant odor. Make sure to rinse your brushes thoroughly until the water runs clear to remove all residues.
Solution: Rinse the brushes more thoroughly with clean water to ensure all residues are removed.
-
Bacterial Growth: Makeup brushes can harbor bacteria from the products you use, your skin, and the environment. When not cleaned properly, these bacteria can multiply and produce a foul odor.
Solution: Use an antibacterial brush cleanser or a mixture of water and mild soap to clean your brushes. Ensure they are completely dry before storing them to prevent bacterial growth.
-
Inadequate Drying: If your brushes are not dried thoroughly after washing, moisture can get trapped in the bristles, providing a breeding ground for bacteria and mildew, which can lead to a musty smell.
Solution: Allow your brushes to air dry completely before storing them. Ensure they are positioned in a way that allows air circulation to reach all parts of the bristles.
-
Old Brushes: Over time, the bristles of makeup brushes can absorb odors from makeup products, oils, and the environment. If your brushes are old and have absorbed odors, it can be challenging to completely remove the smell.
Solution: Consider replacing old brushes that retain persistent odors.
- Storing in a Humid Environment: Storing your brushes in a humid or poorly ventilated area can encourage mold or mildew growth, which can produce a musty odor. Solution: Store your brushes in a clean, dry place with good ventilation. Avoid damp or humid areas.
- Infrequent Cleaning: If you don't clean your brushes regularly, makeup residue and bacteria can build up over time, leading to a persistent odor. Solution: Develop a regular cleaning routine and clean your brushes after every use or at least once a week.
Why does my makeup brush leave streaks?
Here are some common reasons why makeup brushes may leave streaks and tips on how to avoid them:
-
Brush Quality: Low-quality brushes may not have evenly distributed bristles or may not be properly shaped, which can result in streaks during application. Investing in high-quality brushes with well-crafted bristles can make a significant difference.
Solution: Consider upgrading to better-quality brushes that are designed for the specific makeup product you're using.
-
Brush Shape: The shape of the brush should match the type of makeup product you're applying. Using a brush with the wrong shape can lead to streaks. For example, a flat foundation brush may leave streaks when used with a liquid foundation meant for a buffing brush.
Solution: Use brushes that are specifically designed for the type of makeup you're applying. For liquid foundation, a buffing brush or makeup sponge is often more suitable.
-
Brush Technique: The way you apply makeup with a brush matters. If you're using a dragging or swiping motion, it can leave streaks, especially with liquid or cream products.
Solution: Instead of dragging the brush across your skin, try a stippling or buffing motion. This involves lightly tapping or swirling the brush to blend the makeup evenly.
-
Product Texture: The texture of the makeup product can affect how it applies with a brush. Some products, especially those with a thick or heavy texture, may require specific application techniques to avoid streaks.
Solution: Experiment with different application techniques, such as using a damp makeup sponge or your fingers to blend heavy or thick products.
-
Product Quantity: Applying too much makeup product at once can lead to streaks because it's challenging to blend it evenly.
Solution: Start with a small amount of product and build it up gradually, blending as you go to achieve a streak-free finish.
-
Primer and Prep: Failing to use a suitable primer or prepare your skin properly can affect how makeup adheres and blends with a brush.
Solution: Apply a makeup primer that suits your skin type and texture to create a smooth base before using your brush.
-
Brush Cleaning: Dirty brushes can accumulate old makeup products, affecting their performance and causing streaks.
Solution: Regularly clean your brushes to remove residue and maintain their performance. Use a gentle brush cleanser or mild shampoo for cleaning.
-
Skin Texture: The condition of your skin, including dry patches or uneven texture, can make streaks more noticeable.
Solution: Exfoliate and moisturize your skin regularly to create a smoother canvas for makeup application.
Why are my makeup brushes cracking?
Here are some common reasons why makeup brushes may crack and how to prevent it:
-
Low-Quality Materials: Brushes made from lower quality materials are more prone to cracking. The handles, ferrules (the metal part that holds the bristles), and bristle materials should be of good quality to ensure durability.
Solution: Invest in higher-quality brushes made from reputable brands or manufacturers. Look for brushes with sturdy handles and well-attached ferrules.
-
Excessive Force: Applying too much pressure or force while using the brushes can stress the handles and lead to cracks, especially if they are made from cheaper materials.
Solution: Use a gentle hand when applying makeup and avoid pressing too hard with the brushes.
-
Dropping or Impact: Accidentally dropping the brushes or subjecting them to physical impact can cause cracks or damage to the handles or ferrules.
Solution: Be cautious when handling your brushes and avoid dropping them. Use brush holders or cases to protect them during travel or storage.
-
Exposure to Harsh Chemicals: Some cleaning products or solvents used to clean brushes may contain harsh chemicals that can weaken the materials over time.
Solution: Use mild and gentle brush cleansers or shampoos specifically designed for cleaning makeup brushes. Avoid using strong chemicals or alcohol-based solutions.
-
Moisture and Humidity: Exposing brushes to moisture or high humidity for prolonged periods can cause the materials to weaken, including the wood handles.
Solution: Store your brushes in a dry and well-ventilated environment to prevent moisture-related damage. Avoid leaving brushes in the bathroom where humidity levels can be high.
-
Aging: Over time, the materials in makeup brushes can naturally degrade, especially if they are subjected to frequent use and cleaning.
Solution: If your brushes are old and showing signs of wear and tear, consider replacing them with new ones.
-
Extreme Temperatures: Extreme temperatures, both hot and cold, can affect the materials of makeup brushes, causing them to become brittle and crack.
Solution: Store your brushes in a moderate temperature environment, away from direct sunlight or extreme heat or cold.
-
Improper Storage: Storing brushes haphazardly without proper protection can lead to damage, including cracks.
Solution: Use brush holders, cups, or cases to store your brushes when not in use to prevent them from being crushed or damaged.
Why are my makeup brushes stiff after washing?
If your makeup brushes become stiff after washing, it's likely due to residual soap or cleaning product, hard water deposits, or improper drying techniques. Here are some common reasons why your makeup brushes may become stiff after washing and how to prevent it:
-
Residual Soap or Cleaning Product: Incomplete rinsing of your makeup brushes after washing can leave behind soap or cleanser residues. When these residues dry, they can cause the bristles to become stiff and rigid.
Solution: Rinse your brushes thoroughly with clean water after cleaning until the water runs clear to ensure all soap or cleaning product residues are removed.
-
Hard Water Deposits: If you have hard water in your area, the minerals in the water can react with the soap or cleaning product, leaving behind deposits on the brush bristles. These deposits can cause stiffness.
Solution: Consider using distilled or soft water for cleaning your brushes, or use a water softener if hard water is a persistent issue in your area. You can also use a vinegar solution (one part white vinegar to two parts water) to help remove mineral deposits from the bristles. Rinse thoroughly after using the vinegar solution.
-
Excessive Moisture: Allowing your brushes to remain overly wet for an extended period can cause the bristles to become stiff and lose their shape.
Solution: After washing your brushes, gently squeeze out excess water using a clean towel and reshape the bristles to their original form. Allow them to air dry completely with the bristles facing downward to prevent moisture from seeping into the handle.
-
Drying in Direct Heat or Sunlight: Drying your brushes in direct heat or direct sunlight can cause the bristles to become stiff and brittle over time.
Solution: Avoid using a hairdryer or exposing your brushes to direct sunlight for drying. Let them air dry naturally in a cool, dry place with good ventilation.
-
Low-Quality Brushes: Brushes made from poor-quality materials may not withstand washing as well as high-quality brushes, and the bristles can become stiff or damaged more easily.
Solution: Invest in high-quality brushes made from reputable brands or manufacturers to ensure better durability.
-
Excessive Use of Alcohol-Based Cleaners: Alcohol-based brush cleaners can be harsh on brush bristles, leading to stiffness and dryness if used excessively.
Solution: Use alcohol-based cleaners sparingly and only when necessary. Consider using gentle, alcohol-free brush cleansers for routine cleaning.
-
Brush Shape: If you reshape the bristles while they are wet or if you store the brushes improperly while they are drying, the bristles may become stiff in an unnatural shape.
Solution: Reshape the bristles while they are damp, and ensure proper drying with the bristles facing downward to maintain their original shape.
In conclusion, makeup brushes are not just tools; they are the unsung heroes of our beauty routines. They help us achieve flawless, professional-looking makeup applications day in and day out. However, to keep them performing at their best and to ensure our makeup looks its finest, proper care and maintenance are essential.
If you want a high quality brush to outlast the rest, checkout the Oxygenetix makeup brushes that took almost a year to perfect. Made with eco-friendly fibers and vegan bristles, these brushes are unique, durable, and achieve a flawless finish every time.
OXYGENETIX SMOOTH FINISH FOUNDATION BRUSH
OXYGENETIX SLANTED PRECISION CONCEALER BRUSH


发表评论
此站点受 hCaptcha 保护,并且 hCaptcha 隐私政策和服务条款适用。